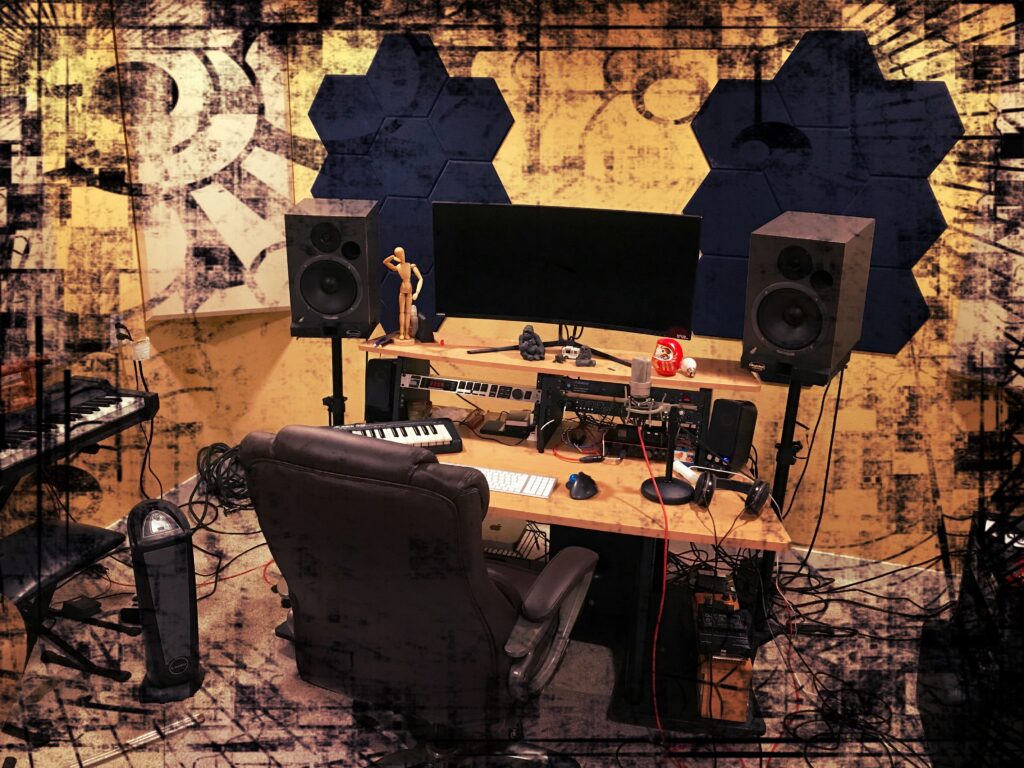
There are many of you out there who play instruments, write songs and have amazing musical ideas swirling around in your head but have no idea how to get them out and into a recorded song for others to hear. Fortunately, this is not as overwhelming and complex as you might think. The best audio engineers have training and years of experience under their belts, but the good news is that you don’t need an engineering degree to do this! You just need some basic knowledge and a few pieces of equipment. A bit of practice will then get you quickly to the level where you can record your stuff and it will sound decent. Let’s take a look at the equipment you will need to get going.
Computer
First, you will need a computer and a hard drive with at least a couple of gigabytes to store your music projects. You don’t need some super fast top of the line mega computer because, unlike video or gaming, an audio workstation app is fairly static. You turn virtual knobs, push virtual faders, and watch the audio waves while recording and playing back. That’s just about it! You then take the audio waves that you recorded and use special little apps called plugins to mix the sound. The mixed sound can then be exported to a music file. Bang! Done! What you do with the file after you record it is your business, but it will be ready for everyone to hear.
Digital Audio Workstation
On the computer, you’ll need to install an application called a digital audio workstation, or DAW. The DAW allows you to create projects where you record audio and MIDI tracks. Each project will be set to a specific sample and bit rate of your choice. Tracks are placed vertically in the project window while the length of the tracks scroll horizontally across the screen. You can start, stop, fast forward, rewind at any point in the song and record on each track separately. Most DAWs have time signature and tempo tracks to let you set those parameters anywhere in the song. Tracks can be edited in a variety of ways. Parts can be split and moved around, MIDI notes can be manually changed, you can transpose one or all of the instruments, the quantization can be altered. You can save individual tracks, stems or complete mixes at any time in almost any file format. And that is just the tip of the iceberg! The mix window provides channel strips for each track, busses, sends, inserts and a master section. Basically everything you would find on a studio recording console.
Plugins
You can use outboard gear if you like, but these days, you are more likely to assign effects ‘in the box’ using plugins supplied by the DAW or provided by external sources. There are literally thousands of plugins available from many different companies. Some are free but most you have to pay for. They range in price from $20 up to thousands of dollars. Plugins come in two types – effect and instrument.
Effect plugins modify the sound of an audio signal. They include EQ, limiters, compressors, reverb, delay, distortion, pitch correction, sequencers, etc. If you can think of a way to change or warp a sound, then there is probably a plugin effect to handle that. In addition to offering unique ways to alter sounds, plugin emulations are available for most of the of famous hardware units created throughout the history of recording. Most of the outboard gear you drool over when you see pictures of larger recording studios is available as a plugin. Want the sound of the ’60s for your recording but don’t have tens of thousands of dollars to buy vintage hardware? Plugins are available to accomplish this at a fraction of the price. Many of the better versions are spot on accurate in recreating the sound of the original hardware.
Instrument plugins convert MIDI notes into audio signals. These plugins can be synthesizers, drum machines, emulations of physical instruments found in the real world, or brand new instruments never heard before. As with plugin effects, some of the emulations of real guitars, drums, orchestral instruments, harmonicas, didgeridoos, steel shelving units, etc. are outstanding. There are also some truly creative and wacky plugin instruments out there! Anything a creative mind can think of can be recreated as an instrument plugin.
The plugin format you use depends on your computer and DAW. There are 6 main audio plugin formats:
- VST – Used in Ableton Live, FL Studio, Cubase, Nuendo, Reaper
- AU (Audio Unit) (Mac Only) – Used in Ableton Live and Logic Pro
- TDM – Used in Pro Tools with dedicated hardware like outboard DSPs
- AAX – Used in newer versions of Pro Tools (Pro Tools 10 and earlier)
- RTAS – Used in later versions of Pro Tools (Pro Tools 10 and later)
- NATIVE – Uses the internal processing algorithms of a specific computer
Speakers (Monitors)
The next essential piece of equipment is a pair of speakers. After all, you need to hear what your DAW is producing. Called monitors in the biz, these need to be the best you can afford and need to be designed to offer a flat response so you can hear exactly what the audio signals are giving you. Speakers designed for clubs, cars and your living room are usually a bit colored and not completely true to the original recording. The bass and high end are usually boosted a bit and the midrange is diminished slightly to provide the most enjoyable listening experience. Studio monitors need to be as flat as possible so that when you mix, you are not compensating for any coloration from them. For example, if you have a boosted low end in your monitors, you will turn the bass down in the mix. When played back on another set of speakers later on, the low end can then sound thin.
Headphones
Headphones have been given a bad rap over the years. Sure, mixing on great monitors in a well tuned room is the best option, but not all of us have that luxury. If you have a home studio in your apartment, then the odds are that your space is a compromise at best. Your soundproofing and acoustic treatment may not be adequate. Your roommates, family or neighbors may object to you playing the same phrase over and over again to get it right. In these cases, headphones are the way to go. Major advances have been made recently to deliver great sound through them. By nature, when working with monitors, there is a certain amount of bleed between them so left and right are not absolute. Some of the newer headphone amps address this issue by providing left and right bleed to the headphones. You’ll need to spend a bit more money on headphones that are designed for the studio but you can use them and get a great mix. Read my blog on headphones to get more information on using them in the studio.
Microphones
If you are recording anything that doesn’t plug directly into your computer, you will need a microphone. There are many properties that go into the design of a microphone, but initially you only need to be concerned with two things – the type and polar pattern. Microphone types include dynamic, condenser and ribbon. When you are beginning your recording journey with a limited budget, a dynamic mic will serve you well. They are sturdy and can be applied to almost all recording situations. Be prepared to spend at least $100 on one. Anything cheaper is not going to give you great sound. A Shure SM57 is great when you are just starting out. When you can afford it, your second mic should be a condenser. These provide better dynamic range, a sweeter more nuanced sound, and can pick up more clarity and detail. These are the go-to mics for recording vocals. They are more expensive, but they are essential for getting that professional studio sound. Ribbon mics can be used in most any recording application and provide a clean natural sound. These are delicate microphones because of the internal ribbon and should be treated gently. They are, therefore, not the first mic you should invest in when starting out. However, they will add a great option to your mic locker later on when you can afford it.
Polar Patterns
It is essential that you understand your microphone’s polar pattern. A polar pattern defines how much of the signal will be picked up by the microphone from different directions. Using the correct polar pattern will minimize unwanted noise from different parts of the room. To understand the concept of polar patterns, think of a 360° field surrounding the microphone. 0° is the front of the microphone and the angle where the microphone has its maximum sensitivity.
The most common polar patterns are:
Cardioid:
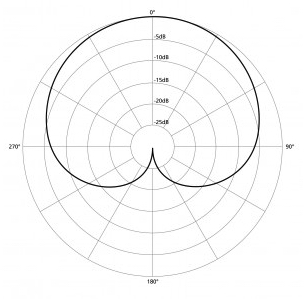
- The most common directional polar pattern
- Most sensitive from the front
- Least sensitive from the back
- Reduced pick up from the sides
- Increased resistance to feedback
Supercardioid:
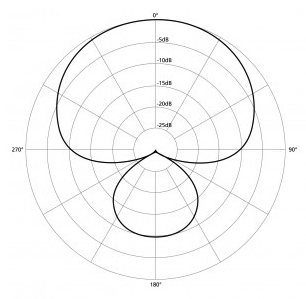
- Narrower direction of pickup than cardioid microphones from the front
- Enhanced rejection of unwanted background sound
- Very dry signal
- Smaller amount of pickup at the back and sides
- Extremely resistant to feedback
Hypercardioid:
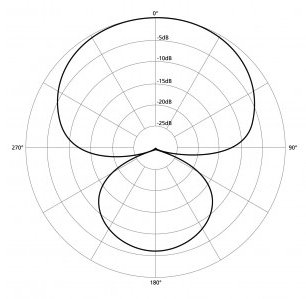
- Even narrower direction of pickup from the front
- Even better rejection of unwanted background noise
- Small amount of pickup at the rear and sides
- Equally good at isolating a single source in noisy environments
- The most resistant to feedback
Omnidirectional:
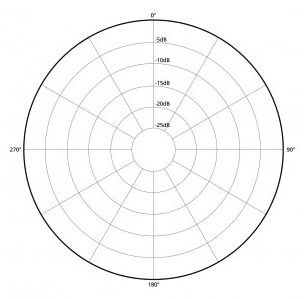
- Captures sound evenly from every direction
- Doesn’t have to be pointed in one specific direction
- Delivers the flattest frequency response and best bass response
- Least sensitive to handling noise
- Ideal for capturing acoustic instruments or wide sound sources (like a choir or orchestra etc)
Bidirectional (Figure Eight):
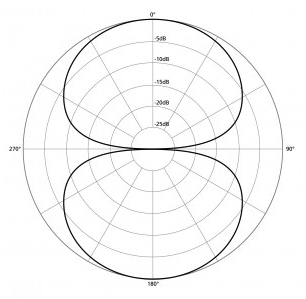
- Captures an equal amount of sound from the front and back of the mic
- Doesn’t capture any sound from the sides
- Effectively captures your source, as well as the natural characteristics of your space
- Least bass response
- Most sensitive to handling
Lobar (Shotgun):
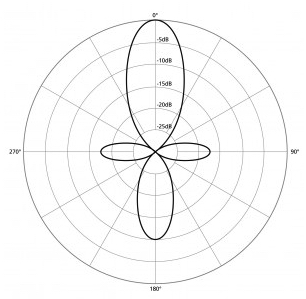
- Narrowest pickup angle of all patterns
- Picks up a little bit of sounds coming from the sides
- Used mostly for shotgun mics capturing dialog directly in front
Audio Interface
Now, how do you get the audio from your microphone into the computer? You use our last piece of essential equipment, an audio interface.
In a nutshell, an audio interface has an “A to D” component which converts an analog sound into a digital signal and sends it to the computer. These can be lo-impedance microphone inputs and/or hi-impedance line inputs for plugging in your synth, electric piano, guitar, etc. Most interfaces also have a “D to A” (digital to analog) component to take a digital signal from your computer and send it out as an analog sound for your headphones and speakers. If you are just starting out, you can find quality interfaces that, depending on how many inputs and outputs you need, are fairly inexpensive. For example, if you only need one one microphone input, you can purchase the Focusrite Scarlett Solo interface for $99.99. It contains a headphone output and 2 line outputs for left and right speakers. Prices rise dramatically for additional inputs and outputs and more features. Higher quality models and brands cost into the thousands but are made with class A components and are equipped with superb preamps.
Final Thoughts
As with most passions that are driven by technology, you start at a point that you can afford and then work your way up as you can afford it. This is true for each of the devices I’ve mentioned here. Computers, digital audio workstations, sound shaping plugins or hardware, speakers, microphones and digital interfaces start in the tens and proceed up into the many thousands. You get what you can afford and make it great with your creativity and experience. You could bring together everything you need for well under $1000 if you scour the internet and get creative with your purchases. Look for used equipment on sites like Reverb.com or Facebook Marketplace. You can usually find what you need well under the price of that shiny new piece of kit in the shop window. Once you have the equipment I’ve mentioned here, you will be well on your way to making creative and professional sounding music. There is no reason you can’t have that song in your head out there for other people to put into their heads!
Please check out my tutorial Your Sound Sanctuary. The tutorial contains 14 videos divided into 6 modules that go into detail explaining how to find the perfect space for your home recording studio, soundproofing, acoustic treatment, a more detailed explanation of the essential equipment you’ll need to start your studio, other equipment you’ll need to make your studio run smoothly and how to set your space up so that everything plays together nicely.