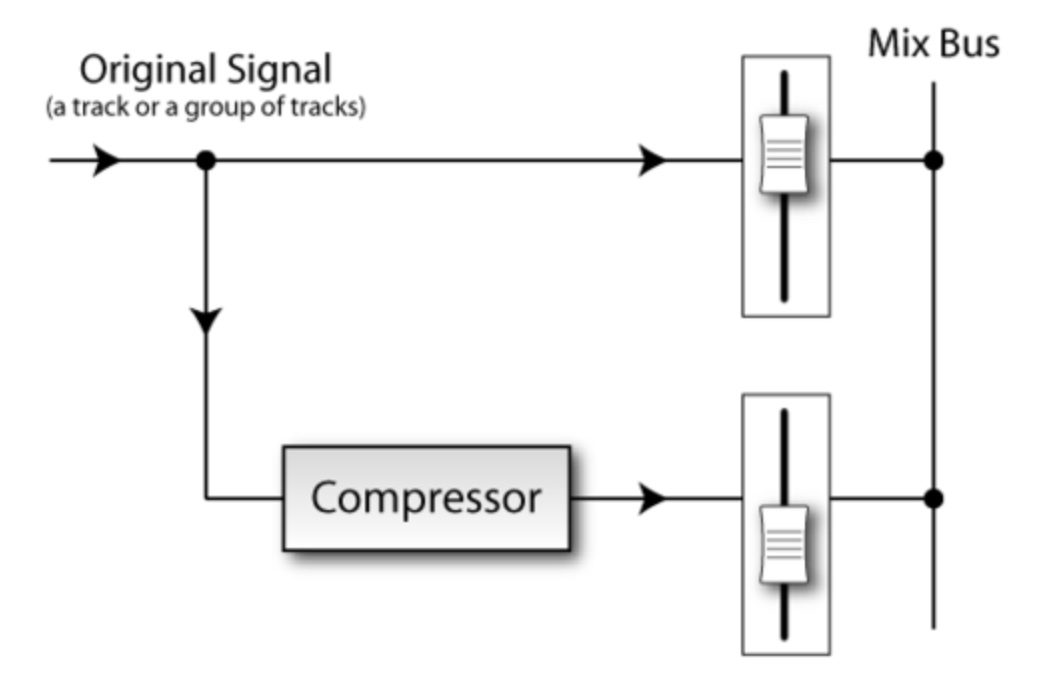
Parallel Compression
Parallel compression is a technique that provides the compression you need on a track or bus to bring up the quieter sounds without compromising the quality of the louder levels. To understand how to apply parallel compression, lets first take a look at how a compressor works. The function of a compressor is to reduce the dynamic range of the sound – the range of signal levels between the quietest and loudest parts. Below is a picture of a very popular VCA type compressor.
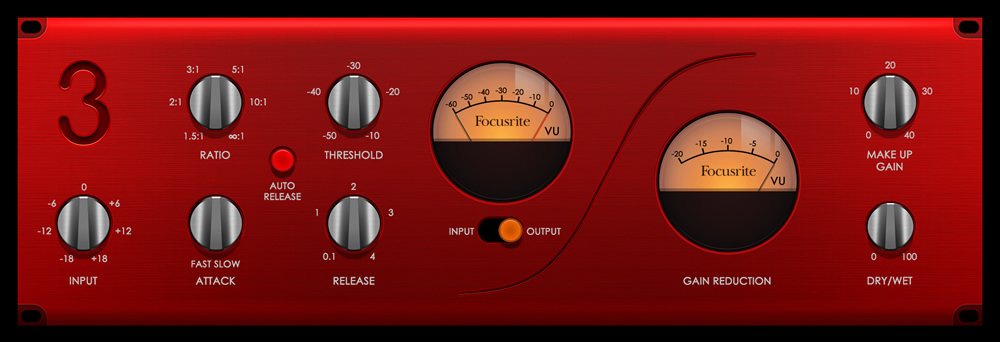
With this compressor, you can
- adjust the input volume
- set the threshold to determine at what level the compressor will kick in
- set the ratio which attenuates the sound level above the threshold
- set the attack and release which determines how long it takes the compressor to kick in and ease out
- adjust the output level of the compressed signal (make-up gain)
The model shown above also gives you the ability to adjust the blend of dry vs compressed signal that goes to the output.
Most compressors apply what is known as downward compression. This type of compression squashes the louder levels above a threshold that you set. These louder sounds get squashed by a ratio that you also set. So if you set your threshold to have the compressor kick in at, say, -20dBFS, all the sound under that threshold is not affected by the compressor. The sound above -20dBFS will be squashed based on the ratio you set. If you set your ratio to 2:1, then the level of that sound will be decreased by half.
Here is a graph that visually shows these level changes using hard knee compression. Soft knee compression does the same thing, but in a more gradual way. In that case, the lines in the graph would have a gentle curve to them.
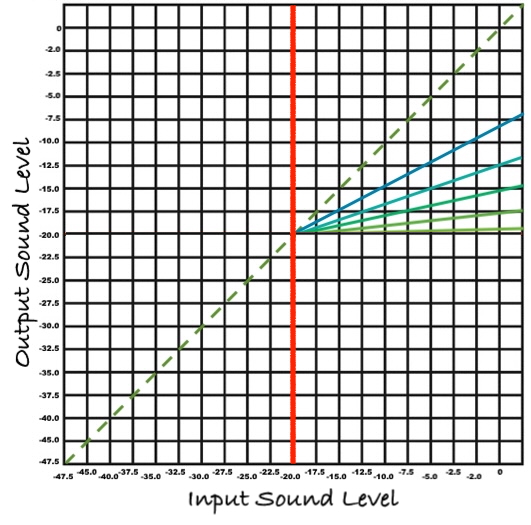
The dotted green line running straight up the middle at 45 degrees shows the response with the compressor bypassed. The sound coming in is exactly the same as the sound going out. This is equivalent to a ratio setting of 1:1 (input sound = output sound). The red line shows the threshold level set at -20dBFS. You can see that any sound under that level is not affected. When you apply a ratio of 2:1, then the sound above the threshold is attenuated by half. On the graph, the blue line shows a 2:1 ratio. When the input is 10dB above the threshold, instead of being -10dBFS at the output, the sound is attenuated to -15dBFS which is a reduction of half the level, a compression ratio of 2:1. The rest of the lines show gradually increasing ratios of 3:1, 5:1, 10:1 and 40:1. After you get to a 20:1 ratio, the attenuation becomes much less noticeable no matter how much the input level exceeds the threshold. At this point, the compressor is acting more like a limiter.
The problem with downward compression is that we usually don’t want to loose the punch of the sound above the threshold. You can use the make-up gain to raise the level of the output to equal that of the input. This will raise the overall level of both the lower, uncompressed sound, and the higher compressed sound. The problem is that the louder sound will still sound compressed. Some of the definition will still be lost. This is probably not the sound you are shooting for. What you are really looking for is to bring up the level of the sound below the threshold while keeping the sound above the threshold unchanged. Kind of like upward compression. As of this writing though, I have not found a device that can perform that bit of magic in a useful way.
So, what to do? This is where parallel compression comes in. It is actually a very simple concept. You create a bus that feeds a normal downward compressor such as the one shown above. You’ll then send the signal that you are working on to that bus. In the compressor, you are going to really squash the louder sounds so you’ll want to set input fairly high and the threshold low. The ratio you will want to experiment with to find your sweet spot. Some engineers like it high, maybe even up to a limiter range of 20:1 to 40:1. Others prefer a lower setting of 2:1 or 3:1. Whatever ratio you decide on, the result will be to push the lower, uncompressed sound through to the output and bring the louder, compressed sound down. The attack should usually be set fast so that the compressor comes in quickly, however you should definitely play around with the attack setting. You can sometimes pick up more punch from the louder sound when you slow down the attack time. A slower attack will back off the compression at the beginning of the signal which can tighten up the compressed sound and let through more of the natural transients from the original signal. As with the attack, you will usually want to set the release low so that the uncompressed, quieter sound returns quickly to the output. However, a fast release can sometimes be too “in your face” and can even introduce a small amount of harmonic distortion. If you find this happening, try slowing down the release just a bit. These issues are especially true on a drum bus. Speaking of drum buses, when using parallel compression, there is a danger of washing out the higher transients like cymbals. Rather than trying to compensate for this in the compressor (or any other signal processing you add to the bus), often the better choice is to not send the overheads to the compression bus at all. Only send the kick, snare and toms. This will allow the subtle high end transients of the metallic instruments to shine from the original, dry signal. The takeaway here is that you need to tweak all the settings to arrive at the perfect compressed sound that you can then blend with the original uncompressed signal. Be sure to save the compressor settings as a template so that you can quickly bring them back up the next time you need them.
Now that you have the perfect compressed signal, it is time to mix it back in with the dry, uncompressed signal. Start off by turning the compressed signal completely down. Bring up the original, dry channel and then, slowly bring up bus channel with the compressed signal. You should hear the track start to fatten up as the compressed signal comes in but the top end should remain crisp and clear. Work with the two channels until you achieve the perfect blend.
When you have two signals coming back instead of one, it would seem obvious that the level of the combined signals would be louder, 6dB louder in fact. While it is true that you will need to make some adjustments to the level of the combined output, it is not as hot as you might expect since the compressor channel will be outputting the loudest signal peaks at roughly 20dB quieter than the dry channel. In fact, you will find that the quieter parts, which do increase by ~6dB, also won’t need any gain correction since there’s no active gain manipulation going on. The end result is that you get the benefit of the increased level of the quiet parts from the compressed signal while the loud but delicate transients are left completely intact.
Here’s a tip: the compressor shown above provides the ability to mix the dry signal with the compressed. So, you ask, why can’t I just use that instead of creating a separate bus? The effect is the same. That is true, but very often the compressor you want to use will not have that feature. More importantly, you are very likely going to want to add additional processing to the bus after the compressor. For example, you may want to add EQ to boost or attenuate certain parts of the signal. Some engineers chain multiple compressors in the bus to achieve a particular sound. The point is, it is preferable to leave open the option to add additional processing of the compressed signal. For that, you will need the parallel bus.
Parallel compression is now a standard tool in most recording sessions. Whether it is used for drums, vocals, bass or any other audio source, it provides a way to really pump up your tracks. When used correctly, the difference between the dry version and the parallel compressed version can be staggering. There are many videos out there that provide a before and after example. Take a listen. Once you set up parallel compression in your project, your tracks will immediately sound fatter and punchier and you will never look back.
For more details on what compressors do, how to use them and the different types available, please watch my video at https://www.youtube.com/watch?v=GQkk9hh83p0.